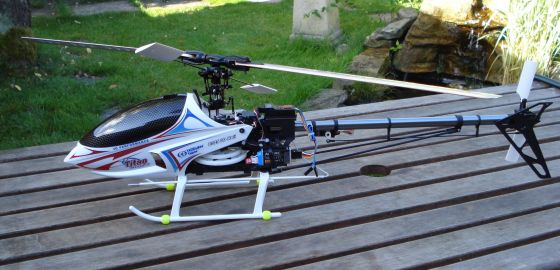
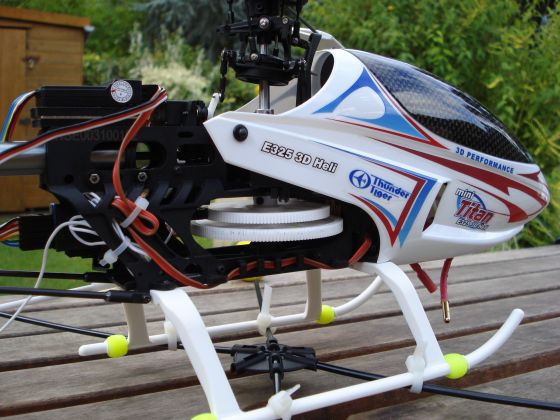
Thunder Tiger Mini Titan E325
Warning! This is a catalogue of disaster that will make you wince and cringe. If you feel like contacting me about anything written here, please be constructive! Comments like 'You are a divvy, I never had that problem as I am perfect' are not very helpful as I already know that as a fact, it merely serves to remind me that I ALWAYS have to find out the hard way despite my best intentions.
This page documents my association with the Thunder Tiger Mini Titan E325 3D helicopter. Starting with my initial checks that proved to be flawed, continuing to the inevitable first crash. How I then repaired it and then learned to fly it properly (that last bit is still in the future as I type this). It will serve as a reminder to myself of how to check it and then set it up again when the next crash happens.
Initial Checks and Problems

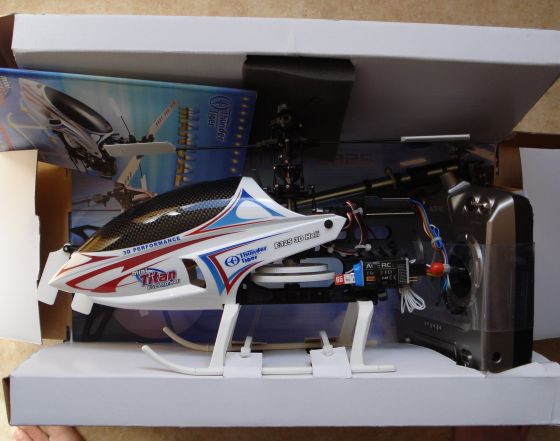
I bought the Thunder Tiger in August 2010 from Modelzone almost ready to fly, it required the tail boom putting in place and the tail servo connecting. After battery charging, it was supposed to be ready to fly. I know that this is rarely the case with anything so I spent quite some time checking it out and researching on the internet. This as it turned out was woefully inadequate but I was unaware of that fact at the time.
The Transmitter
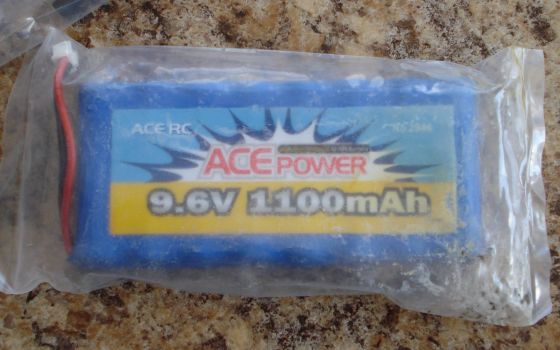
On initial unpacking, I discovered that the transmitter battery pack had leaked inside its sealed bag (fortunately all the nasty goo was contained within the sealed bag). The LiPo battery was puffed up, I knew enough at this stage to not put it on charge, I contacted Modelzone who told me to go back in, they gave me replacements for both batteries.
Leaky Battery
Broken Charger
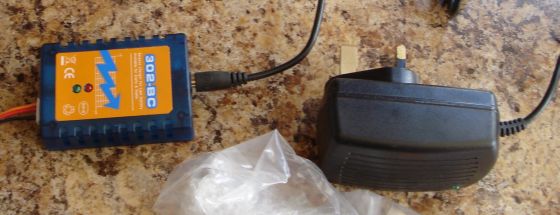
Replacement Charger
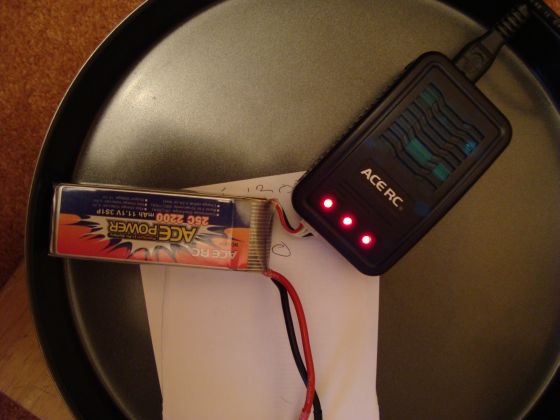
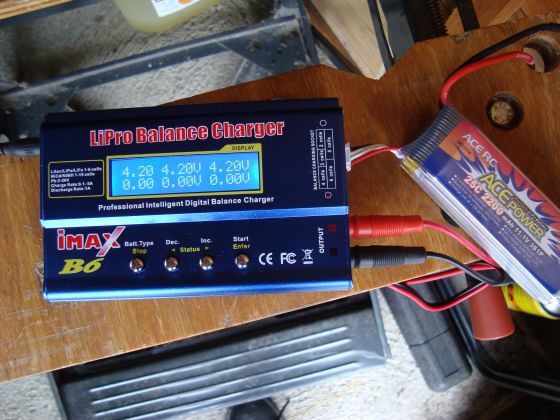
I got home and put them on charge, immediately the LiPo charger went pop and stopped working. Yet another trip to Modelzone saw me back home again with a replacement LiPo charger. Put it on charge, 12 hours later the charge lights turned to green indicating it had done its stuff.
I Googled to see how long LiPos should take to charge to see that it should really take about 1 to 1.5 hours. The Battery was a 2200mAh 3 cell one, the charger states 650 mAh x 3 (is that 1950mAh?) and therefore charge time should be about 1 hour 10 minutes. Although it is a balance charger and therefore might take a little longer from what I read.
Next began the assembly and setting up checks. I had at this stage failed to find a lot of the helpful information mainly found at www.helifreak.com which has a forum dedicated to the Mini Titan with a huge number of pages and a lot of very helpful and friendly contributors. As a consequence of my ignorance, I missed a lot of the very important setting up procedures.
The only damage I found on the helicopter was a ruined grommet on the canopy mount. I cut two small pieces of fuel line, pushed one on the mounting peg, put the canopy on and then pushed the second piece on to secure it.
Setting up
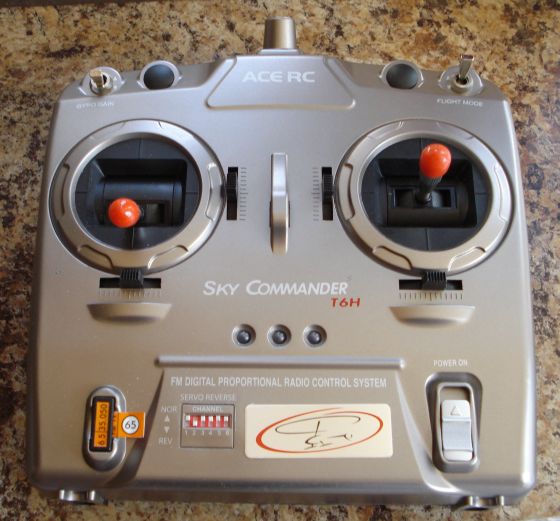
The manual with the helicopter is very good as it shows how to build it from a kit. Complete with all the information you could possibly need to build and rebuild the helicopter. However, when it comes to the setting up of the radio side of it, it is fairly vague as the radio is not supplied with the kit (I think). So it only shows suggested mounting places for the radio gear. My Thunder Tiger came with an ACE RC setup. The transmitter is an Ace RC Sky Commander T6H, the receiver an Ace TR602FD, the three collective servos were Ace C1016 and a tail servo Ace CR0915. Finally an ACE RC TYG6100M gyro and BLC40A Electronic Speed Control.All of the documentation had occasional odd or confusing translation problems that I am sure all of us have seen. I was unfamiliar with most of the terms used and so had real trouble following the instructions, especially as they were spread about over several sheets and at times appeared to be contradictory.
There were separate leaflets detailing various of the above mentioned parts.
The manual for the transmitter was vague and terse. Useless is a more succinct way of putting it. There were four further leaflets.
Sheet 1. One strip entitled '....Brushless Motor ... Manual' containing fitting info that I found of no use as it was already fitted.
Sheet 2. One sheet detailing the Electronic Speed Control, the relevant part being the Function Mode Chart, listing the possible settings for Battery Protection, Motor Timing, Brake Mode, Throttle Sensitivity and Flying Mode. The instructions for setting this up were clear and detailed, fortunately. I ensured that it was set up with all of the recommended factory default settings.
Sheet 3. One small strip entitled 'Quick Start'. This contained information that confused me. At one point it mentions setting 'sub trim' for the servos which the supplied system does not have. It says to check the movement direction of the servos, I had no idea which direction they were supposed to move in although checking back with the main helicopter manual does confirm which directions they should move. With hindsight I can see why the radio manual does not say which direction the servo should move as it depends on which model it is fitted into. It says to place the throttle at 35% and fit the collective servo arms parallel, the main blades should be at 0 degrees. I have since discovered that this is for setting up the 4 channel radio but it doesn't mention this on the sheet. Mine is the 6 channel radio and the settings are different. It then goes on to talk about setting the collective pitch range. At this point with so many things I did not understand I tried Googling some of the problems and managed to become even more confused.
4. One sheet entitled '...Heading Lock Gyro & E-CCPM Mixer Manual'. This sheet turned out to be one of the more important ones with regards to setting up of the servos and control surfaces. Here it details setting up for 4 channel and 6 channel radios separately. I should have put a line through the 4 channel setup sooner than I did as this was the source of confusion to me on several occasions when I started reading the wrong information. It mentioned entering Idle Up mode. I had no idea what Idle Up mode is or how to enter it. There was no mention of it anywhere else in the documentation. At first I thought Idle Up mode was entered by simply raising the throttle stick above 35%. That is how it could be read in the info. I had no idea that flipping the switch on the transmitter labelled 'Flight Mode' switched on Idle Up mode (and only when the throttle stick was above 35%). I also had no idea which way the switch should be flipped for which mode, having no idea what was supposed to happen and when it was supposed to happen caused me a lot of headaches even when I finally did find out it was something to do with that switch.
It really started to annoy me having to shuffle through lots of bits of paper not understanding half of the words and retracing my steps repeatedly having set something up incorrectly (maybe, or maybe not!).
Not being able to get past this first stage of getting the arms onto the collective servos correctly was a big problem to me. Later I realised what the problem really was, I was never going to be able to do it even if I knew how, but we will come to that in due course!
As a consequence of not being sure how to set up the collective servos correctly, I convinced myself that they had been set up and assembled correctly by the manufacturer already and went on to the next checks which was the swash plate being level. I checked it by eye and thought it looked OK! At this point I had, for some reason convinced myself (out of hope I think) that the kind people building the Mini Titan had set it all up properly for me. I was not sure how to check the collective pitch range and angles. I wasn't aware you could get a tool to do the job. I was not aware of checking main rotor center of gravity and balance.
The next important part of sheet 4 detailed setting up the rudder. This was when my headaches really started. Again the sheet mentioned using 'Sub Trim' to fine tune the servo but there is no sub trim on my setup. It says 'Check the switches on the gyro are in the correct position' but does not state what the correct position is but does go on to imply it amongst the later blurb. It describes how to set up the servo and check it is operating correctly.
Then comes the killer bit of info, this really confused the hell out of me. It says:
'Move the rudder stick to the left and right, adjust and check the linkage. Make sure there is no binding on both sides.'
Sounds simple and implies the rudder should move both ways and should not move too far at either extent. Time to test it out: Move the stick to the left, nothing happens. Move the rudder stick to the right, even a small amount and the rudder creeps right over to its full extent towards the tail boom. I messed about for hours trying to understand what was going on. I rang Modelzone who seemed not to know what I was talking about. I eventually managed to talk to someone who seemed to have an inkling but still got no nearer to the truth. The rest of this sheet had sections of what seemed like gobbledygook to me which I just bleeped over.
Flying
So, eventually, after a lot of headaches, I convinced myself that all was set up OK by the manufacturer. I was ready for my first flight.
I had attached a trainer frame to the skid. I suspect it was not strong enough as it was flat to the ground with the helicopters weight on it. I think it could have been fastened on a bit better too although I don't remember problems with it shifting.
Taking off, it seemed to go all over the place and was coming down very heavily. Never having flown a helicopter before I was not confident with the controls and had a tendency to slam both sticks straight down in unison when getting into difficulty. The Mini Titan took some hard knocks on my grass and tiny bits of the tail rotors were getting knocked off in collisions with hidden stuff under the grass. The bracket that stops the LiPo battery sliding down and forwards came off allowing movement. I repositioned the mounting elastic bands. The body mounting pegs broke, I glued them back on.
I used up two full battery charges on this. Twelve hours to charge the LiPo and 10 hours to charge the transmitter every time. I don't know what the power consumption of the transmitter is, but either the Nicad pack was ruined or the 1100mAh capacity was not enough. There was hardly enough juice in the battery pack to power the transmitter for 20 minutes. I am fairly sure that should not be the case. It was not possible to place separate batteries into the battery compartment of the transmitter as there were no springs in there although there were mounting lugs and recesses for some. I considered strapping a battery pack from another transmitter to the underside of this one (would not fit inside the compartment) so I could use ordinary batteries (my usual preference for a transmitter) instead.
The Inevitable First Bad Crash
Come the third flight I had taken the Thunder Tiger with me to my son's house. His garden is a lot smaller. He has a smaller helicopter and flies it off a large plywood sheet to ensure a level takeoff. There was a bit of a blustery wind. I had an audience of most of my family watching as I took off, nose dived, caught the trainer on the edge of the plywood sheet, tipped over, the main rotors striking the tail boom with huge force. At some point in this unfolding disaster, I made matters far worse by forgetting the controls and slamming both sticks downwards. The end result was a shower of small pieces of helicopter scattering around the garden. Fortunately no one caught any of the pieces. My wife who was watching, immediately burst into a tirade of shouts aimed at me, mentioning money and other such things I think I prefer to forget. My youngest Son was laughing heartily and my young Grandson attempted to console Granny with 'It's alright Granny, everything's alright.' Everyone else was shocked as it had gone in a big way. I was a bit pigged off to say the least. Gathering up the sad pieces, I bundled them all into the box and forgot about it until July 2011. I could not bring myself to look at it until then.After a Pause, Regrouping and Repairs
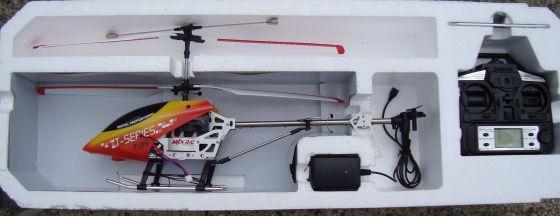
Hopefully, we now get to the part of this page where other people might find some useful info that will help. This is how I proceeded to the point where I could have an uneventful session of trying to hover without any disasters.In July 2011 I fancied getting a new helicopter. I had not examined the wreckage of my Thunder Tiger since putting it back into its box at my oldest son's house. I just assumed it was going to be considerably cheaper buying a new one rather than repairing the Mini Titan. I researched on the internet and eBay for a cheap, easy helicopter and finally decided on a T-34 Shuttle. It had excellent write ups, the You Tube videos looked good and it was cheap. So I ordered one off eBay. It arrived the next day, checked it out. It had a myriad of problems, melted wires on the LiPo battery leads. The LiPo charger popped as soon as I plugged it in (what on earth is it with me and chargers?). The canopy was faulty, it would not fit properly. When I tentatively spooled it up in the garden with the small amount of juice the batteries had, it started to do all sorts of odd things. I immediately gave up and returned the helicopter for a full refund.
T-34. Unlucky Again it Would Seem
So I decided to get the Mini Titan out of the loft and check it over. I dismantled it and checked out what it needed. The manual listed all the part names and numbers. Here is the list of parts I required:
Damage
Tail BoomCockpit canopy
Main Rotors
Tail Rotors
Tail servo mounting flange
Tail support rod bracket (broken whilst dismantling boom)
Skid
Main frame base
Tail drive gear set
Main shaft
Feathering shaft
Tail pitch control set
Mainshaft bearings (replaced as a matter of course as so cheap, didn't appear damaged)
Vertical fin
Fly bar
All 3 collective C1016 servo gears damaged
Base plate
The Removed Broken Bits
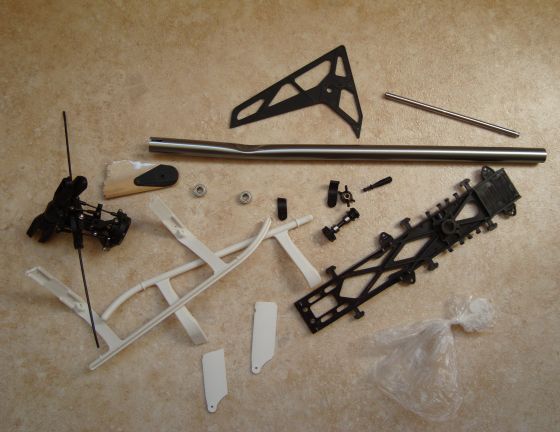
The rotor assembly in this photo was not damaged, just the flybar. The feathing bar looked OK but I exchanged it anyway seeing as one came with the crash kit.
Parts
All prices below are the full cost including postage.I researched around on the internet looking for prices of all of these parts and eventually found http://www.fusionhobbies.com who stocked part TT3845 a Thunder Tiger Crash Kit. Containing all of the parts I required apart from the servo gears, base plate, canopy and tail drive gear set. This represented quite a saving (although bought separately the parts usually come in twos whereas in the crash kit you get mostly one of everything). Fusion Hobbies took a few days to get the canopy and tail drive set and then sent the package on to me all well packed with a bag of sweets too! All for a grand total of £46.47p
Fusion Hobbies went out of their way to be friendly and helpful with phone calls and emails to keep me informed of the progress of my order. I can highly recommend them.
Baseplate from Fast Lad Performance. Total of £7.69. Also arrived next day in good condition.
Tail rotors and canopy mounts I had bought in 2010 not long after getting the helicopter but arrived after the crash, so I still had those from Channel 4 Models. £8.73
I bought the mainshaft bearings from a seller on eBay £4.20 for a pair
Servo gears eBay seller £11.15 for 3 sets for C1016
White Lithium grease for servos eBay seller £1.95
Four HXT900 Servos from an eBay seller £13.98
Swash plate eBay seller £25.27 RETURNED UNOPENED
I will clear up the swash plate mentioned above first. With the force of the crash I was not sure if the swash plate was OK as it had a little bit of play on the main bearing. I tried to find out by Googling how much play is acceptable on the swash plate main bearing and could not get a definitive answer other than none is best, which of course figures. I decided the best bet would be to send off for one and compare the old with the new. This I did without opening the new one's packaging. The play was exactly the same on both so I returned the new one for a refund. A bit unfair on the seller I know but I could not think of a better way as no local shops have any bits worth mentioning.
Total £86.48 for the repair. About twice what the T-34 cost me but maybe worth it. Time will tell.
Flying Help and Simulators
This page was really helpful towards me getting my act together. It set me on the right track: raptortechniqueI found it very helpful. It got me in the right frame of mind to approach the whole process in a logical and methodical manner.
I bought a copy of RC Heli Master with a USB dummy transmitter and downloaded FMS the free helicopter simulator.
I then discovered that I could get a USB lead to connect my real transmitter to the PC, enabling me to get used to the feel of it. I spent many hours playing with the simulator.
Repairs
The repairs commenced.Started by Aralditing the tail servo that had a bit of the mounting almost broken off. This fixed well so I didn't see the need to replace it as I don't see it breaking easily.
I also Araldited a lug on the base plate that had broken off and remained screwed to the skid. This I was not so happy with which is why I ordered a replacement base plate. On arrival of the replacement, I tried to snap the repaired lug off without success so have stashed the old base plate away for possible re-use at a later date.
Replaced the three sets of servo gears for the existing C1016 collective servos. I had bought four replacement servos (the HXT 900 mentioned in the above list) before finding the replacement gear sets. I thought it would be easier to replace the gears rather than try to get new servos to fit and work properly. Greased the gears with white Lithium bicycle grease.
Replaced all the rest of the broken parts with no problems worth mentioning.
Setting up Take Two
So then came the setting up and back to where I was the year previously with my brain addled. Mind you, by this time, with all the researching I had been doing, at least most of the terminology wasn't going over my head.I bought a pitch gauge as I knew that it was something required but at that stage had no idea why! £3.78 from a seller on eBay. Actually, I made one from a PDF printout and a paperclip but it transpires it wasn't going to work very well, I didn't even try to use it.
I went though a long process of trial and error with a lot of emphasis on the error sadly. I will not detail that here as it may end up too confusing. I certainly was confused. In summary, the combination of pidgin English and scattered contradictory manuals plus sometimes misleading and rubbishy info on the internet did not make the job of setting up easy. I tried to approach the setting up logically and methodically and failed.
The only advantage I had was determined patience and the occasional bottle of beer to leave it alone for a bit.
Set up the Rudder
This is where I gave up the previous year (see above where I couldn't understand how the tail servo worked). The combination of not knowing what was supposed to happen and a misleading manual had left me thinking that either I was brain dead or the gyro was faulty... or something. I had found a really good message board, Heli Freak www.helifreak.com with a dedicated forum for the Mini Titan sporting 86 pages (as I type this) of helpful questions and answers. I put this question up:helifreak.com
Within a few hours I had an answer and was happy that in fact I only had to adjust the position of the servo on the tail boom until the helicopter didn't spin left or right. Major headache relieved. Celebrate with a bottle of Crabbies
Get the Collective Servos Working
I kept getting confused as to what point I should be using to put the servo arms on. A combination of reading the wrong part of the manual, not understanding what flight mode on the transmitter was and not knowing what throttle up was did not help at all.I got my head around all of these things by first of all working out how to get throttle up on my helicopter. I experimented and worked out that the switch labelled 'Flight Mode' on the transmitter was indeed the switch that needed to be flipped for Throttle Up. That the throttle needed to be greater than 35% up for switching the switch to actually engage Throttle Up. I realised that when the switch was flipped to a certain position when the throttle stick was placed full up that the swash plate was moved, when the switch was flipped up and down with the throttle stick down, nothing happened (this proved to me it was indeed the Throttle Up switch). From this I could then write on my Transmitter which position of that switch was Throttle Up. At last! I was getting somewhere. Throttle Up was engaged with the throttle stick above 35% and the switch labelled 'Flight Mode' then flipped down.
So we make sure that throttle up is engaged then and we put the throttle stick at 50%. Hang on, no marks on the throttle stick anywhere, OK it has to be straight up, but the slightest movement makes a difference, so I put a mark on the mechanism to make it easy to know where 50% is, also ensuring that it always goes back to exactly the same spot when setting up and testing.
So now I know where the throttle needs to be to then place the servo arms on at 90 degrees. Another hitch appears, I cannot get the Elevator servo to 90 degrees on Throttle Up with the stick at 50%. There is no sub trim on the servos. The problem being that the arm looks as though when fitted has had the wrong side of the double arm cut off. If the other arm had been used, it would be fine (odd number of teeth on the peg make this possible). I tried to find a replacement arm. Nobody had one in stock. I would have to buy a new servo at £20 to get one! I rang up Modelzone to explain the situation and they were more or less helpful, cutting another long story short, they didn't come up with any help.
Might as well mention Modelzone here. Most of the time they are friendly and try to be helpful but I can't get away from the thought that they only want to sell me new whole models and are not really bothered about the support, for instance, now 11 months after buying the helicopter, they can't replace any faulty bits for me as they no longer have any of these helicopters left to butcher for pieces which is what they said they would do as they say they can't get the bits I need new. Theoretically, my Mini Titan is still under guarantee for these parts as it was a manufacturing problem. I really must avoid going in Modelzone again.
I decided to temporarily knock up a replacement linkage to compensate for the bad servo arm position, knowing this would not really do the job properly, but I wanted to move on with repairs and setting up whilst the search for a replacement arm went on.
I continued with the setting up as detailed below but eventually realised that in fact I couldn't get any of the servos to 90 degrees properly (looks like they were all fitted without Throttle Up engaged which put adjustment slightly out and slightly impossible!) so I decided to start again and fit the new HXT900 servos I had bought. The left and right aileron servos fitted perfectly as a direct replacement but the Elevator servo was just a little too large for the bracket. I was loathe to file down the helicopter frame, so I filed down the servo casing to fit as it was really only a tiny amount required, most of which was recovered by removing the sticker off the casing first.
Heaven! At last! It all looked good, servo arms at 90 degrees all 3 in line with Throttle up and 50% throttle stick.
Level the Swash Plate
I had found a tip for getting the swash plate level. I found it accidentally whilst looking for other stuff, when I realised this was something I needed to do I tried it myself to discover that it works really well. Just place a plastic tie on the mainshaft and cut it so it just protrudes over the ball joint of the links, push it down so it just clears the bump of the ball joint mount then spin the rotor blades. The clip should pass over all four bumps on the swash plate with exactly the same clearance. If it does not, then adjust accordingly until it does.Levelling the Swash Plate
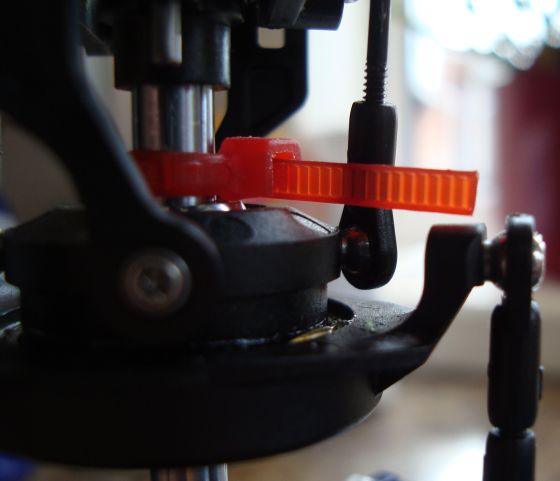
In the photograph above you can see I had to cut off one side of the tie body so it would sit lower down, this had the effect of making the tie easily removable and reusable!
At this point I realised I had the swash plate moving the wrong way. The ball joints are on the leading edge of the rotors. The swash plate moves differently to most helicopters which have their ball joints on the trailing edge of the rotors. On the Mini Titan the swash plate must move down when the throttle stick is moved up. Fixed by setting the dip switches on the transmitter correctly. Something else I had not really sussed out as fully as I should have done. Of course, as the collective pitch is controlled by the E-CCPM, only one dip switch controls the direction of all 3 servos. At one point when swapping the leads about in the gyro, I forgot which was my left and right (actually, the left plug is on the right of the gyro and the right plug is on the left of the gyro which doesn't help), causing a brief period of anguish. Another hiccup occurred when, again due to plug/gyro confusion I had the elevator and aileron servos moving in opposite directions. I have seen all of these problems mentioned by other folks asking why odd things are happening to their servos and wonder how many of these are caused by simply not following wires and not reading labels properly.
Right is left and left is right

Balance the Blades
The Mini Titan manual briefly states 'It is suggested to balance the blades'. I did not pay any attention to this when setting up in 2010. However, this time, I decided to follow it up and found this page of very useful information:balancing
I balanced the blades as suggested by finding and equalising the center of gravity for both blades and then balancing them.
I should mention the main and tail rotor blade bolt torque settings here. There are differing opinions on this but this is mine! Thanks to robblac for prompting this. The tail rotor blades should be tightened so that they remain in place until tapped very lightly with the finger. The main rotor blades should be tightened so that when the helicopter is held with both blade edges parallel to the ground (nose down for example), they stay in line until the helicopter is jerked upwards when the blades should then move and point vertically. Over tightening can cause the blades to be unbalanced as they can't move to even themselves out. Under tightening can cause boom stikes which are a major disaster, I know from bitter experience. When the main rotor hits the tail boom on a heavy landing, it can cause major damage.
Set the Pitch
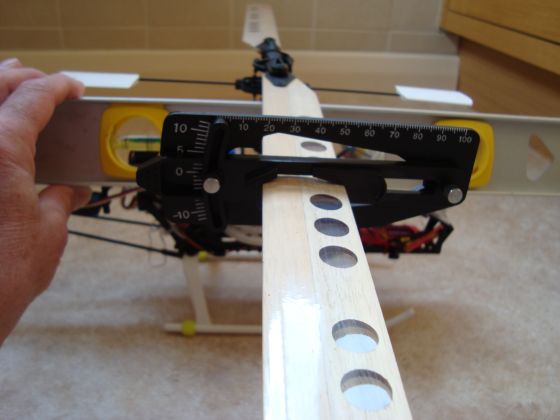
With everything together and looking good, the next stage was to set the main rotor collective pitch angle. I used this page to help:how-to-use-a-pitch-gauge-t2312
With my cheap eBay gauge and my huge builder's style spirit level and a lot of fiddling about, I finally got everything as it should be. Holding the spirit level under the rotor, near the flybar and at the same time holding the flybar with the tips of my fingers, then levelling it up. Then viewing the flybar, spirit level and gauge all at once to check the angle. This procedure is for a 6 channel radio with a Throttle Up switch using the TG6100M.
The four and five channel radio setup procedure is different, (ignore Throttle Up as it is not available. Move throttle stick to 35% for 0 degree setting. Pitch should be +4 degrees at throttle stick 50%. Then do part 3 and 4 below)).
6 Channel Pitch Setup
1. Set Throttle Up.2. Move throttle stick to 50%. Pitch should be 0 degrees for Throttle Up (+4 degrees if Throttle Up is off) on the rotor blade with the flybar level. Done on both rotor blades.
3. Throttle stick to full, check and set required pitch on both blades. +12 degrees (same for both Throttle Up and Throttle Up off)
4. Throttle stick to bottom, check and set required pitch on both blades. -12 degrees for Throttle Up. -6 degrees for Throttle Up off.
5. Throttle Up switched off and repeat 2. 3. and 4.
Mixing lever top links for big adjustments. Bottom links for small adjustments. Always 1 full turn as clips should only be fastened onto the ball one way. Bottom links move the angle half that the top links move it. In other words, top links for large adjustments, bottom links for fine adjustments.
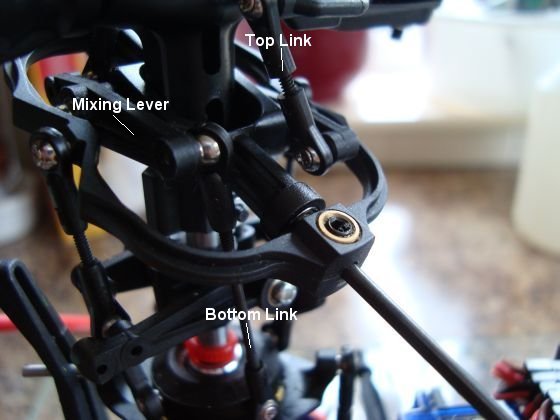
Working one handed, this image is not exactly as I would have liked but I hope it gets the message over. Holding the flybar, spirit level and gauge all in line and level (none of which is quite true in this photo!).
Center of Gravity
With the helicopter fully set up for flight, suspending the helicopter by the flybar and with the flybar at 90 degrees to the helicopter body line, the helicopter should be level. Move the battery forwards or backwards to compensate and get the helicopter's center of gravity at the flybar.Tracking
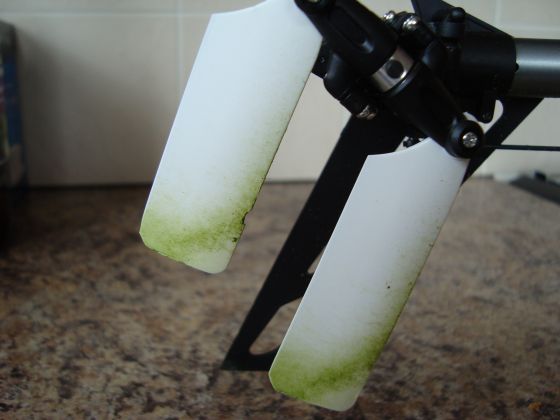
I have to check the tracking but apparently I can only do this whilst hovering. That is a while away yet then. I have placed different coloured strips on the rotors in readyness for the check. Whilst hovering and looking at the blades at eye level, they should appear to be at the same level as one another, the tape should appear white (so I understand)Check and Set The Electronic Speed Control (ESC)
Switch the receiver on with the motor disengaged from the main gear and the throttle full on. After hearing 6 Tones (indicating full throttle has been calibrated), move the throttle to the lowest position. After hearing two sets of two tones

(four tones in total) the throttle idle position has been calibrated.
There then follows a series of tones which indicate a function and its options. To select a particular option you wait for the series of tones to correspond with those marked on the chart (reproduced below) and then push the throttle stick to maximum and wait for the confirmation sound, two sets of two tones
(four in total). Then move the throttle stick back down to idle and await the next function mode setting you wish to change.
When finished, disconnect the battery and the settings will have been stored.
This was another area where I had a bit of a problem as I read in my searches on the internet that there is an error in the manual that lists the various settings for the ACE BLC-40/65/75 ESC. However, I found it difficult to ascertain whether my manual was correct and what the correct settings actually were. I eventually found a copy of the correct table to discover that my manual had been correct. Here is a table containing the correct settings (the default settings are marked in bold). My apologies to users of smaller screens here, the table does not fit the screen, but it will drag to view:
Function |
Option Mode |
Combination of Sounds |
| Battery Protection | Light Discharge Protection LiPo | |
| Standard Discharge Protection LiPo | |
|
| Heavy Protection Discharge LiPo | |
|
| +5v cut-off for NiMH NICd | |
|
| Motor Timing | Auto | |
| Soft | |
|
| Standard | |
|
| Hard | |
|
| Brake Mode | None | |
| Soft | |
|
| Hard | |
|
| Throttle Sensitivity | Soft | |
| Standard | |
|
| Quick | |
|
| Flying Mode | Airplane | |
| Helicopter with governor | |
|
| Helicopter no governor | |
Trainer?
Decided against fitting the trainer to the skid as I am sure it had a very small part in the crash in 2010.What was my plan here?
 Well I didn't carry it out!
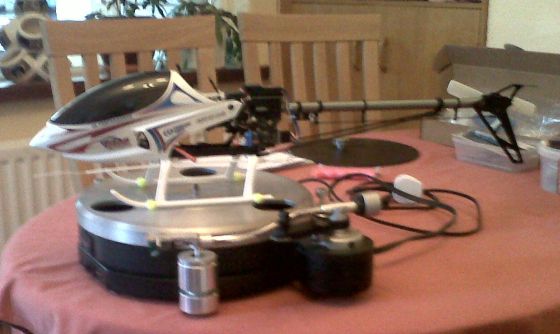
In the process of trying to understand the way the gyro, tail rotor and servo interacted I found a video on You Tube that showed someone using a helicopter tied to a rotating platform strapped to a tripod. I considered using a turntable to experiment and see what happened. Fortunately, I received a response from my post on Heli Freaks before I got around to trying this out because I am sure it could only have ended in disaster. It just shows how desparate I was getting.
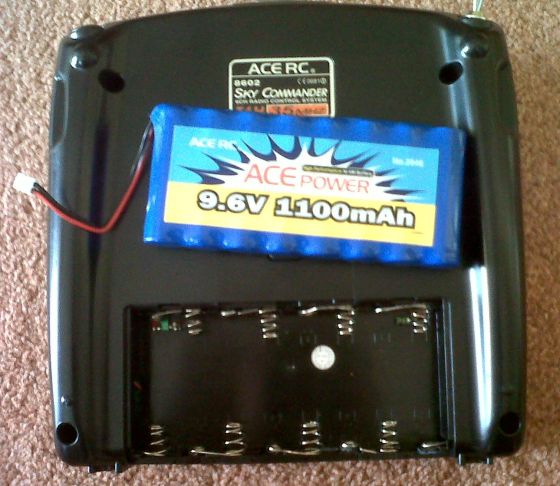
Transmitter Batteries
Whilst doing all of these checks, I had a real problem with the transmitter battery pack going flat all the time, after about 20 minutes it was going off, then (theoretically) 10 hours to charge it up again (110mAh charger). Bit of a nuisance to say the least. Using an 1100mAh battery when I have a lot of 1800mAh AA NiCads kicking about seems daft.The transmitter battery box is not big enough to hold the cassette type battery holders I have in my other transmitters, but there are lugs and recesses in there to accept battery springs.
I used to make and sell battery replacement packs for the BBC Master 128 Computer. I had some of the battery boxes in my loft, so I dismantled some and fitted the springs into the transmitter battery box. Wired it in with a plug and Bob's your Uncle.
Transmitter Adaptation
I have bought a new LiPo charger as I am sure 12 hours wait while the battery charges is ludicrous, limiting me to 1 flight a day when, to be able to hover reasonably well, I need to get 100 flights in at least so I read. More to come on that when it arrives. What's the betting it goes pop when I plug it in. Oh yes, I await the arrival of a fire blanket too, to wrap the LiPo in whilst charging, cheaper than a LiPo bag.
I am contemplating buying a pair of very reasonably priced LiPos off eBay too, that will enable me to fly just about constantly when the weather is suitable.
I use the word 'fly' above in a very loose sense of course. Currently, as I type this, after 3 battery charges I can sport hops of 1 to 2 inches for 3 to 4 seconds where lack of confidence or loss of control demands a drop to earth. I did go to 12 inches for a brief moment but curtailed my enthusiasm to emulate some of the amazing videos I have seen on You Tube.
2011 First Flights and Diary
After spending a lot of time on the simulator RC Heli Master using my own transmitter rather than the supplied one which I gave to my oldest son (he only needs to buy the disc of software for it now) I felt a lot more confident with the controls. I had learned the importance of holding the transmitter correctly (pinching the sticks between forefinger and thumb) and was far less likely to slam both sticks down in panic when faced with a problem. I had learned a few rules such as always keeping the tail towards you, avoid use of rudder, stay low, put it down if it starts to get away from you. You are steering the nose when using the rudder! Sounds simple I know, but keeping that in mind has helped me considerably. Keep all of these things in the front of your mind and try not to think about the jobs you are supposed to be doing instead of this.22/07/2011 One battery used. On grass cut to about an inch long. Not level and uneven. As a result, hovering low is tricky as it catches the lumps and grass, the tail rotor occasionally digs in a bit if the helicopter gets in a dip.
24/07/2011 As above
25/07/2011 One battery used. On a open air concrete base. Much better, easy take off and landing manage 2 second hops. Getting the idea of how the helicopter needs adjusting slightly on takeoff. Keeping it within a 12 foot square, so if it starts to go outside that square, I put it down.
26/07/2011 The LiPo charger came today, it didn't go pop when plugged in to my shed car battery. Must be a first. Full balance charge in just over an hour, marvellous. Got two goes today, one on the concrete and one on the grass. Videoed the first go on the concrete. Here is a short clip, rubbish I know:
New LiPo Charger
Seems to work well. As anticipated, it charges in around an hour
27/07/2011 Four batteries used on the grass. Bought a second LiPo. Seem to be going better on the grass despite how uneven it is. Getting a bit braver and hovering for around 3-4 seconds at times. Sometimes, it even goes where I want it to! A tail rotor blade got a chunk knocked out of it and I am not entirely sure how. Didn't come down any more heavily than usual and couldn't find anything hard in the grass. I suspect it was one blade hitting another. Mind you, the photo does show that I have been doing a good job of cutting the grass with it. Another order placed with Fusion Hobbies. Something makes me think they are going to get a few more quid out of me before I am hovering proficiently (if ever!). Later... The chipped blade in his photo broke on a heavy landing on the fourth battery, fortunately, I had a spare to keep me going until some more arrive from Fusion Hobbies.
28/07/2011 Five batteries emptied today. Getting longer hovers (5-6 seconds), under control most of the time but not happy with my progress, especially after watching some clever people on You Tube that can do amazing things after only 15 minutes practice. Mind you, I am enjoying it which is the main thing isn't it?
29/07/2011 Three batteries emptied today. Stopped by the wind getting up a bit higher than I found comfortable. Managing to hover about a foot off the ground for about 10 seconds at times.
30/07/2011 Right, time to document why I have been having problems hovering. Since day one I have been unable to get a handle on heading hold mode/gyro/rudder interaction. Try as I might, I cannot get the nose of the helicopter to stay pointing in one place with heading hold engaged. I have read stuff all over the internet to try to come to grips with it and tried all sorts. The closest I have got to getting it sorted out is to run it with a bit of rudder trim to the right to stop the nose moving around to the left (anti-clockwise) constantly. If rudder trim is zeroed (as I know it must be), the nose slowly moves around to the left in small jerks, doing a ful circle in about 30 seconds or so. Today, having finally found a good (by good, I mean something I understood) explanation of what gyro gain (and various other important things) does at gyroconfusion.htm I realised that if I switched heading hold off that I could apply trim without breaking any of the 'rules'.
Heading Hold is controlled by the switch on the transmitter labelled 'Gyro Gain'. It is flipped down so that the LED on the receiver glows green for Heading Hold off. If the Gyro Gain switch on the transmitter is in the up position, the LED on the receiver glows red and Heading Hold is on. None of the documentation supplied with my Mini Titan states this!
Doing this I eventually got the rudder adjusted so that virtually no trim is required for the nose to stay put. It is only a matter of time and small adjustments before no trim will be required. So, using heading hold off, I flattened three batteries today, on the third go, I was managing repeated bouts of 30 seconds and more hovering about a foot off the ground before cumulative over-corrections forced me to put it down to stop a disaster. I am fairly sure this is a confidence thing, after hovering for what seems like a long time I start to feel happy and then realise that usually happiness is followed by disaster and unhappyness. Time to celebrate :-) My wife (rightly) reminded me that disaster was only a millisecond away :-( The replacement tail rotor blades arrived from Fusion Hobbies, with a bag of sweets again, should keep the Grandson happy.
31/07/2011 One battery flattened. Videoed some of it. Should have had the camera level I suppose:
01/08/2011 Flattened one battery and nearly flattened a second, disaster struck! I either hit the chain link fencing at the bottom of my garden or a mixing lever broke. I am fairly sure I was a good distance from the fence but I am not ruling it out. The result was the following damage:
Main Rotors
Tail Rotors
Mainshaft
Mixing Arm
Main Gear
Tail Rotor Shaft Assembly
Feathering Shaft
Tail Boom
Tail Boom Stay Bracket
Flybar
Flybar Paddle (annoyingly the bar had broken as it entered one of the paddles)
Rudder linkage rod
15/08/2011 It took a while to get the parts required as Fusion Hobbies were let down by their suppliers and it was a week or so before I discovered this, they could not supply the 'Crash Kit' . Got it from Fast Lad Performance. Odd one this, it has been cheaper for me to get the Crash Kit which contained most of the parts I required. I opened it up (Factory sealed sticker on it intact) to discover that the Flybar was bent. I always check stuff that is supposed to be flat on a glass kitchen worktop protector and the glass lid of our cooker which is perfectly flat. The flybar was packed inside the tail boom so had obviously been packed in the factory bent. Not very good. Anyhow, Fast Lad Performance posted me a replacement (Later addition: The replacement flybar was also bent, I rang Fast Lad about this to be told that they are easy to straighten and easy to bend. Not 100% the answer I was looking for but I decided not to press the point. I must be mellowing in my old age although I am not sure how many of my family would agree with that observation). Flattened three batteries (third one was hovering for about 3 minutes at the dizzying height of between six inches and two feet, mostly under control) but not before discovering my original LiPo would not charge, the charger stating 'Battery Low'. Read up about it on various sites and decided to give it the 'Charge as an NiMH' treatment. I know this is risky so I did it in the open air with protective gear. Starting voltages were (something like) 3.4v 3.2v and 2.7v Charged it as NiMH at 1A for 15 minutes whilst monitoring each cell until the low cell came up to 3v. The battery then successfully charged on the usual LiPo setting. It also discharged in the Mini Titan OK and then recharged again OK. This was the battery that was in the helicopter when I crashed it, but it didn't get damaged. Time will tell whether this was a good move or not!
03/09/2012 LiPo mentioned 15/08/2011 still good. Gave the helicopter a go today for the first time in over a year. Not exactly flying but no damage either. Have replaced the bullet connectors on the power lead with a Deans plug to standardise all my models.
05/09/2012 Many flights in the garden. Lost a flybar control lever, and flybar to a nasty landing. Fortunately, I have a vast array of spares from the many previously purchased crash kits. Fixed and flying in half an hour. There is a tiny amount of damage on the main gear that doesn't seem to effect flight.
I discovered that Heading Hold (gyro on) seems to work. It is a while since I tried it but I suspect my problem in the past has been moving the helicopter by hand after switching it on. I know I was aware you should not do this as it can confuse the gyro and so I cannot see how I was doing it in the past. However, there is no doubt that the gyro is working properly now. Just need some wind free weather now.
15/04/2017 Unused since the last entry. Passed to my oldest son. Will post stuff here if he uses it.
2020 Update. He used it and wrote it off!